> For the complete documentation index, see [llms.txt](https://docs.edgegap.com/llms.txt). Markdown versions of documentation pages are available by appending `.md` to page URLs; this page is available as [Markdown](https://docs.edgegap.com/web-games.md).
# Web Games (JS/TS) - Getting Started
Deploy your first JavaScript or TypeScript dedicated server on Edgegap. A hands-on guide with a minimal Node.js template, upload, and global deployment for browser multiplayer games.
Learn by doing and deploy your first Dedicated Server on Edgegap. By the end of this guide, you will have deployed a dedicated server with Edgegap at no cost.
{% hint style="info" %}
**This guide uses a minimal Node.js WebSocket server template**, which works with any browser game client - Three.js, Babylon.js, PlayCanvas, Phaser, or your own engine. Servers built with frameworks like Colyseus, or running on Bun and Deno follow the same steps.
{% endhint %}
## ✔️ Preparation
Before you get started, make sure to [create a free account with Edgegap](https://app.edgegap.com/auth/register) (no credit card required). You can [invite your team members afterwards](https://app.edgegap.com/user-settings?tab=organizations), even if they don't have an Edgegap account yet.
**Configure a few essentials on your development machine:**
Install Node.js 22 or newer
* [Install Node.js from the official source](https://nodejs.org/en/download), we recommend the latest LTS release.
* Verify your installation by running `node -v` in your command line.
Install Docker Desktop (or Docker CLI)
* [Install Docker Desktop from the official source](https://www.docker.com/products/docker-desktop/) (no account required).
* Restart your computer after completing the installation.
{% hint style="info" %}
**Confident in your server builds?** Skip to [#customize-image](#customize-image "mention") or [Advanced Features](/learn/advanced-features.md) for more.
{% endhint %}
## ⚙️ 1. Connect Account
JavaScript servers don't need an engine plugin. We'll use your command line and our [Dashboard](https://app.edgegap.com/) to build, upload, and deploy your server.
☑️ Sign in to our Dashboard and open [Container Registry](https://app.edgegap.com/registry-management/repositories/list). Note your **project name** and **registry credentials** (username and token), you will need them in the next steps.
☑️ Sign in to [Edgegap's Container Registry](/learn/advanced-features/edgegap-container-registry.md) with Docker, using your registry project name, username and token:
{% tabs %}
{% tab title="Bash (Linux)" %}
```bash
project='';
username='robot$+client-push';
token='';
echo "$token" | docker login registry.edgegap.com -u "$username" --password-stdin 2>&1
```
{% endtab %}
{% tab title="PowerShell (Windows)" %}
```powershell
$project = ''
$username = 'robot$+client-push'
$token = ''
echo "$token" | docker login registry.edgegap.com -u "$username" --password-stdin 2>&1
```
{% endtab %}
{% endtabs %}
☑️ Verify you see `Login Succeeded` in your command line.
✅ You may now proceed to the next step.
## 🔧 2. Build Game Server
Whether you’re using a Windows, Mac, or a Linux machine, your **server will run on Linux runtime**, as most cloud providers nowadays (including Edgegap) run on Linux. Good news - JavaScript is cross-platform, so there's nothing to cross-compile, and Docker will install your dependencies for Linux in the next step.
☑️ **Create a new folder for your server with two files.** This minimal template accepts WebSocket connections and relays every message to all connected players. Replace the relay with your game logic later on.
{% tabs %}
{% tab title="TypeScript - node.js 22.18+ (Recommended)" %}
{% hint style="info" %}
Node.js 22.18+ runs TypeScript files directly (strips annotations), no build step needed.
{% endhint %}
1. Copy the `server.ts` template in your project (unless you have one already):
import http from 'node:http'
   import { WebSocketServer } from 'ws'
   import { DeploymentEnvironment } from '@edgegap/sdk'

   const port = Number(process.env.PORT ?? 7777)
   const deployment = process.env.ARBITRIUM_REQUEST_ID ? DeploymentEnvironment.fromEnv(process.env) : null

   const server = http.createServer((_request: http.IncomingMessage, response: http.ServerResponse) => response.end('ok\n'))
   const wss = new WebSocketServer({ server })

   wss.on('connection', (socket) => {
     console.log(`player connected (${wss.clients.size} online)`)
     socket.on('message', (data) => {
       for (const client of wss.clients) client.send(data.toString())
     })
     socket.on('close', () => console.log(`player left (${wss.clients.size} online)`))
   })

   server.listen(port, '0.0.0.0', () => {
     console.log(`listening on 0.0.0.0:${port}`)
     console.log(deployment ? `deployment ${deployment.requestId} in ${deployment.location?.city}` : 'running locally')
   })

   process.on('SIGTERM', () => {
     for (const client of wss.clients) client.close(1001, 'server stopping')
     server.close(() => process.exit(0))
   })
2. Copy the `package.json` in your project (or merge with existing).
{% hint style="warning" %}
**Type stripping only supports erasable syntax.** Avoid `enum`, `namespace`, and constructor parameter properties, or [bundle your server instead](#customize-image).
{% endhint %}
{% endtab %}
{% tab title="JavaScript (earlier node.js)" %}
1. Copy the `server.js` template in your project (unless you have one already):
import http from 'node:http'
   import { WebSocketServer } from 'ws'
   import { DeploymentEnvironment } from '@edgegap/sdk'

   const port = Number(process.env.PORT ?? 7777)
   const deployment = process.env.ARBITRIUM_REQUEST_ID ? DeploymentEnvironment.fromEnv(process.env) : null

   const server = http.createServer((_request, response) => response.end('ok\n'))
   const wss = new WebSocketServer({ server })

   wss.on('connection', (socket) => {
     console.log(`player connected (${wss.clients.size} online)`)
     socket.on('message', (data) => {
       for (const client of wss.clients) client.send(data.toString())
     })
     socket.on('close', () => console.log(`player left (${wss.clients.size} online)`))
   })

   server.listen(port, '0.0.0.0', () => {
     console.log(`listening on 0.0.0.0:${port}`)
     console.log(deployment ? `deployment ${deployment.requestId} in ${deployment.location?.city}` : 'running locally')
   })

   process.on('SIGTERM', () => {
     for (const client of wss.clients) client.close(1001, 'server stopping')
     server.close(() => process.exit(0))
   })
2. Copy the `package.json` in your project (or merge with existing).
{% endtab %}
{% endtabs %}
{% hint style="success" %}
`@edgegap/sdk` is optional, this template uses it to read [Injected Variables](#injected-variables) on Edgegap. Use our [JavaScript SDK](/web-games/matchmaking.md) for [#session-automation](#session-automation "mention"), or add a third party matchmaker.
{% endhint %}
☑️ Install dependencies and start your server locally:
{% code collapsedlinecount="10" %}
```bash
npm install
npm start
```
{% endcode %}
☑️ Verify you see `listening on 0.0.0.0:7777` and `running locally` in your console, then stop your server with `Ctrl+C`.
{% hint style="success" %}
Server builds should use address `0.0.0.0` and port `7777`. If you customize your port please specify the same in your [Apps and Versions](/learn/orchestration/application-and-versions.md#port-mapping) once you [#id-5.-upload-to-edgegap](#id-5.-upload-to-edgegap "mention").
{% endhint %}
✅ You may now proceed to the next step.
## 🐋 3. Containerize Server
Working in a team of developers means sharing your code. When things go wrong, the last thing you want to hear is “it works on my machine”. Game servers have to run reliably on any machine, since a successful games’ servers will run on thousands of server machines across the world.
To help make your server reliable, we use Docker - virtualization software to ensuring that all of your server code dependencies down to the operating system level are going to be always exactly the same, no matter how or where the server is launched.
{% hint style="info" %}
We recommend watching ["Never install locally" (video)](https://www.youtube.com/watch?v=J0NuOlA2xDc\&ab_channel=Coderized). **You DON'T need to use Dockerhub with Docker**. Docker ≠ Dockerhub. Think of Docker as a programming engine and Dockerhub as it’s App Store.
{% endhint %}
☑️ Start by running `docker version` in your command line to ensure you’ve completed [#preparation](#preparation "mention").
Install Docker Desktop (or Docker CLI)
* [Install Docker Desktop from the official source](https://www.docker.com/products/docker-desktop/) (no account required).
* Restart your computer after completing the installation.
☑️ **Add a Dockerfile and a `.dockerignore` file to your server folder**, a recipe for your image:
{% tabs %}
{% tab title="TypeScript - node.js 22.18+ (Recommended)" %}
{% code title="Dockerfile" collapsedlinecount="10" %}
```docker
FROM node:22-slim
WORKDIR /app
ENV NODE_ENV=production
COPY package.json package-lock.json ./
RUN npm ci --omit=dev
COPY server.ts ./
USER node
CMD ["node", "server.ts"]
```
{% endcode %}
{% endtab %}
{% tab title="JavaScript (earlier node.js)" %}
{% code title="Dockerfile" collapsedlinecount="10" %}
```docker
FROM node:22-slim
WORKDIR /app
ENV NODE_ENV=production
COPY package.json package-lock.json ./
RUN npm ci --omit=dev
COPY server.js ./
USER node
CMD ["node", "server.js"]
```
{% endcode %}
{% endtab %}
{% endtabs %}
{% code title=".dockerignore" collapsedlinecount="10" %}
```
node_modules
.git
*.md
```
{% endcode %}
{% hint style="info" %}
**Start your server with `node`, not `npm start`.** Edgegap sends `SIGTERM` when your deployment stops, and only your container's main process receives it - handle it to implement graceful shutdown.
{% endhint %}
☑️ Build your image, choosing an image name and tag:
{% code collapsedlinecount="10" %}
```bash
docker build --platform linux/amd64 \
-t registry.edgegap.com//: .
```
{% endcode %}
* **Image name** is a unique identifier of your choice, labeling your server build before shipping.
* Usually, this will include the name of your game - for example “my-game-server”.
* Prefix it with `registry.edgegap.com//` using your project name from step [#id-1.-connect-account](#id-1.-connect-account "mention"), so you can upload it later.
* **Image tag** is an identifier pointing to a specific version of your image.
* The term “build artifact” is sometimes used to refer to a specific version of your image.
* Timestamps are a great default option for tagging, e.g. `2026.11.02-16.25.00-UTC` .
* **Platform** `linux/amd64` ensures your image runs on Edgegap servers, even when building on a machine with ARM architecture (macOS M1, M2, M3, etc..).
{% hint style="danger" %}
:x: **DO NOT - overwrite existing tags or use `latest` tag** - this will deploy an outdated cache.\
:white\_check\_mark: **DO - always increase your version tag** and deploy the new build.
{% endhint %}
☑️ Wait for the build to finish and verify there are no new errors in your command line. Completing this step will result in a **new image appearing in your local machine**. You can verify this either in Docker Desktop, in tab Images underneath Local (default), or in docker CLI by running `docker images` .
✅ You may now proceed to the next step.
## 🧪 4. Test Server Locally
Let’s try deploying locally (on your machine) and connecting a game client, to make sure the server image is functioning properly before we upload and deploy (which may take a bit of time).
☑️ Start a new container from your image:
{% code collapsedlinecount="10" %}
```bash
docker run -p 7777/tcp registry.edgegap.com//:
```
{% endcode %}
* `-p {internal port}/{protocol}` publishes and maps your server port `7777` to a random external port. WebSockets use the TCP protocol.
* If you’re using a machine with ARM architecture (macOS M1, M2, M3, etc..) add parameter `--platform=linux/amd64` .
☑️ Verify you see `listening on 0.0.0.0:7777` in your command line. Completing this step will result in a **new container being started** on your development machine.
{% hint style="info" %}
For more details see Docker Desktop / Containers, or Docker CLI command `docker ps` .
{% endhint %}
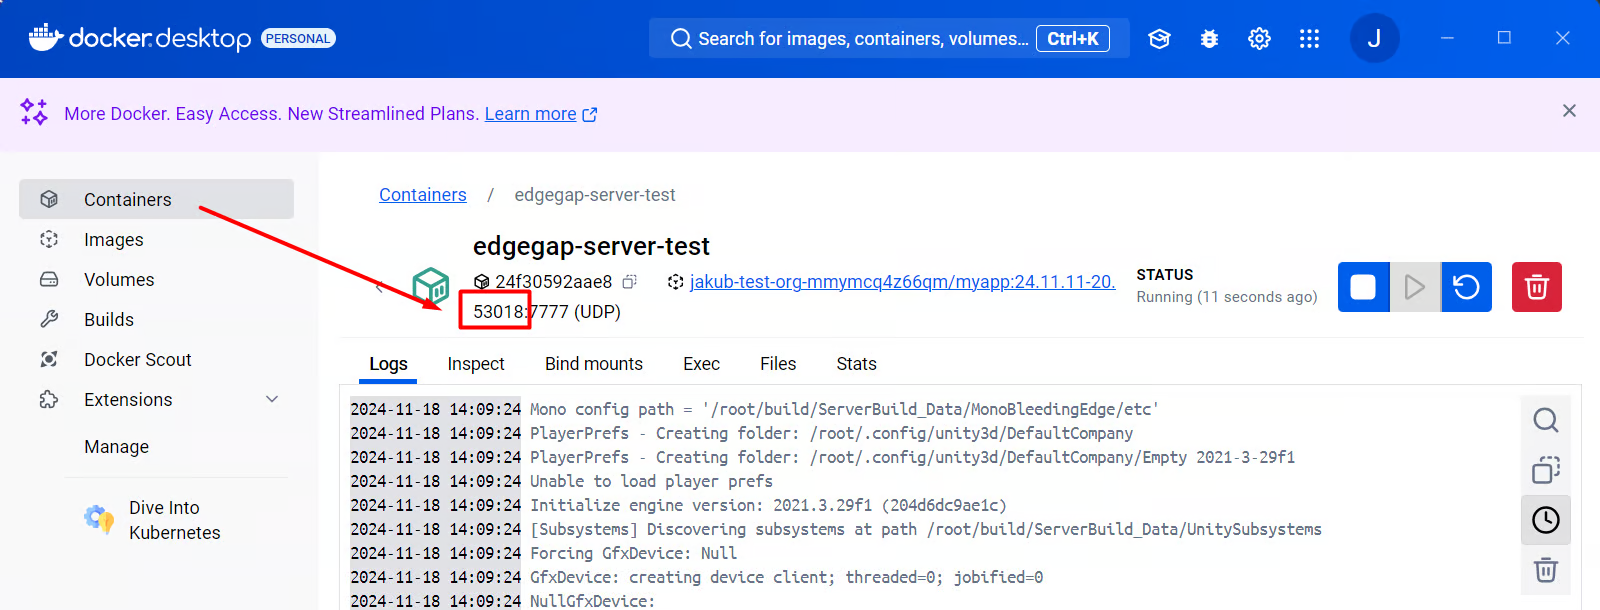
☑️ Now it’s time to **connect a game client to your local docker container** to verify your server image is functioning properly. Open two browser tabs, open developer tools console (`F12`) in each tab and connect to your container using:
* `localhost` in place of server IP,
* randomized external port value found in Docker Desktop / Containers.
{% code collapsedlinecount="10" %}
```javascript
const socket = new WebSocket('ws://localhost:')
socket.onmessage = (event) => console.log('received', event.data)
```
{% endcode %}
☑️ Send a message from one tab with `socket.send('hello')` and verify that both tabs log `received hello`.
☑️ Once you’ve verified you’re able to connect to your local server container and play without issues, you may delete the container 🗑️ to free up resources on your machine for other programs.
✅ You may now proceed to the next step.
## ☁️ 5. Upload to Edgegap
It’s time to ship your server online! Now that your image can successfully host players, we can upload it to Edgegap and start running it anywhere in the world. In this guide, we’ll be using [**Edgegap’s Container Registry**](/learn/advanced-features/edgegap-container-registry.md) (storage for images).
☑️ Upload your image to Edgegap's Container Registry:
{% code collapsedlinecount="10" %}
```bash
docker push registry.edgegap.com//:
```
{% endcode %}
{% hint style="success" %}
Find any image name and tag stored on your machine in **Docker Desktop / Images**.
{% endhint %}
☑️ Wait for the upload to finish and verify there are no new errors in your command line. Completing this step will result in your [build artifact being uploaded to Edgegap’s Container Registry](https://app.edgegap.com/registry-management/repositories/list).
☑️ Open our [Dashboard](https://app.edgegap.com/application-management/applications/list) and create a new Application. You may configure the following options (or keep defaults):
* **Application name** on Edgegap can match your image name or be customized.
* **Application version** on Edgegap can match your tag or be customized.
* Timestamps are a great option for app version names, e.g. `2026.11.02-16.25.00-UTC` .
* Multiple application versions may point to the same image tag, such as `v1.1.0` and `dev` .
* Learn more about [Apps and Versions](/learn/orchestration/application-and-versions.md) later.
* **Image** from step [#id-3.-containerize-server](#id-3.-containerize-server "mention"), select your repository and tag.
* **Resources** of 0.25 vCPU and 512 MB memory are plenty to get started with this template.
☑️ You will now be prompted to define a Port for your new Application version:
* **Port** `7777` matching your server port from step [#id-2.-build-game-server](#id-2.-build-game-server "mention"),
* **Protocol** `WS` (WebSocket),
* **TLS Upgrade** enabled,
* **Name** `gameport`.
{% hint style="info" %}
**TLS Upgrade lets browsers connect with secure WebSockets** (`wss://`). Pages served over `https://` can't open unsecured `ws://` connections, so keep TLS Upgrade enabled for browser games.
{% endhint %}
{% hint style="info" %}
Free Tier is limited to 2 Applications, 2 versions, and 10 GB of Container Registry storage.
{% endhint %}
{% hint style="success" %}
**Using a coding agent?** See [MCP Integration](/docs/mcp-integration.md) to create applications, versions, and deployments without leaving your editor.
{% endhint %}
✅ You may now proceed to the next step.
## 🚀 6. Deploy to Cloud
This is the final step in this guide, after which you will have a server deployed on Edgegap cloud, to which players from anywhere in the world can connect.
☑️ **Choose an application and version** from previous step to deploy.
☑️ Once you’re ready, hit **Deploy to Cloud**, wait to reach [/pages/0UXQAhtFuL0FkdoUmYTh#id-3.-deployment-ready](https://docs.edgegap.com/pages/0UXQAhtFuL0FkdoUmYTh#id-3.-deployment-ready "mention"). Completing this step will result in a [new Deployment being started](https://app.edgegap.com/deployment-management/deployments/list) on your Edgegap account.
☑️ Verify there are no new errors in your console output. Ensure also that your [Deployments](/learn/orchestration/deployments.md#container-logs) don’t show any errors and your [Deployments](/learn/orchestration/deployments.md#container-metrics) don’t indicate 100% resource utilization (vCPU or memory), otherwise new player connections may be rejected, or your server stuck in a restart loop. See troubleshooting steps below to address any issues.
☑️ Now we’ll perform the final test and **connect your game client to your cloud deployment**. Grab your **Deployment’s Host** in place of server IP and the **External Port** of `gameport`, and connect with secure WebSockets from your browser console:
{% code collapsedlinecount="10" %}
```javascript
const socket = new WebSocket('wss://:')
socket.onmessage = (event) => console.log('received', event.data)
```
{% endcode %}
{% hint style="info" %}
The external port of your Deployment on Edgegap cloud will be chosen at random, so that a potential attacker (hacker) is slowed down and detected before they can cause damage.
{% endhint %}
{% hint style="warning" %}
**Disable VPN when testing** for more realistic conditions and receive a [low-latency deployment](/learn/orchestration/deployments.md#server-placement).
{% endhint %}
☑️ Once you verify you’re able to connect to your Deployment without issues and are done testing, **Stop your Deployment** to free up capacity in your account for the next build.
* In case you encounter issues, [inspect Dashboard logs of your deployment](https://app.edgegap.com/deployment-management/deployments/list).
* If you can’t figure out the issue, we’re hanging out in our [Community Discord](https://discord.gg/NgCnkHbsGp) and happy to help.
🙌 Congratulations on your first Deployment on Edgegap! If you’d like to learn more, keep reading.
## 👉 Next Steps
Once you have a working client/server setup, make sure to **save a copy of your project** (using version control software like git) so you can always trace back your steps in case you run into issues.
Continue reading to learn more about topics related to server lifecycle and discoverability.
{% hint style="info" %}
If you need help, [please reach out to us over Discord](https://discord.gg/MmJf8fWjnt). For live games support see our [ticketing system](https://edgegap.atlassian.net/servicedesk/customer/portal/3).
{% endhint %}
### Stop Deployments
Once the match ends (or players leave), your deployment can be stopped to save cost. [Running empty or only partially filled deployments can increase your cost unnecessarily!](https://edgegap.com/blog/how-session-fill-rate-affects-your-multiplayer-hosting-costs)
Stop your deployment from your server code, Edgegap will then send `SIGTERM` to your server:
{% code collapsedlinecount="10" %}
```javascript
const stopDeployment = () =>
fetch(deployment.selfStopUrl, {
method: 'DELETE',
headers: { authorization: deployment.selfStopToken }
}) // example uses javascript SDK to read deployment self stop information
```
{% endcode %}
{% hint style="success" %}
**Call `stopDeployment` when the match is over, when every player left, or when nobody connected** within a reasonable time after deployment started.
{% endhint %}
{% hint style="warning" %}
Connect your [Endpoint Storage](/docs/endpoint-storage.md) to save deployment logs, otherwise they will be deleted!
{% endhint %}
### Injected Variables
Read useful information like deployment ID, server IP address, server location, and more; by accessing injected environment variables. Each deployment automatically includes:
* [Deployment Variables](/learn/orchestration/deployments.md#injected-environment-variables) - automatically supplied by Edgegap,
* [Matchmaking Variables](/learn/matchmaking/matchmaker-in-depth.md#injected-environment-variables) - automatically supplied by Edgegap when using [Matchmaking](/learn/matchmaking.md),
* [App Version Variables](/learn/orchestration/application-and-versions.md#injected-variables) - custom key-value pairs configurable by you.
Read any variable with `process.env`, or parse them into typed objects with our optional SDK:
{% code collapsedlinecount="10" %}
```javascript
import { DeploymentEnvironment } from '@edgegap/sdk'
import { MatchEnvironment } from '@edgegap/sdk/matchmaking'
const deployment = DeploymentEnvironment.fromEnv(process.env)
const match = MatchEnvironment.fromEnv(process.env)
```
{% endcode %}
{% hint style="info" %}
Parsing never throws, so the same server runs locally. Missing variables are listed in a single warning.
{% endhint %}
### Session Automation
When testing new builds with developers or QA teams, the session step is often skipped and players connect directly to deployments while hard-coding or disabling session related features. This enables faster development iteration and isolates session side effects from server features.
{% hint style="warning" %}
**Starting your Deployments manually and pasting URL and ports will not cut it for a live game.**
{% endhint %}
Automate popular game flows for [Player Sessions](/learn/orchestration/player-sessions.md) and server scaling with either:
{% columns %}
{% column width="33.33333333333333%" %}
[Matchmaking](/learn/matchmaking.md):
* Competitive Games
* On-Demand Matches
* Skill Rating and/or\
Custom Rules
{% endcolumn %}
{% column width="33.33333333333333%" %}
[Server Browser](/learn/server-browser.md):
* Persistent or Social
* Long Sessions
* Auto-Assign and/or\
Custom Search
{% endcolumn %}
{% column width="33.33333333333333%" %}
Custom Backend:
* Migrate Live Games
* [Deploy with v2 API](/docs/api/dedicated-servers.md)
* [Observe Webhooks](/learn/orchestration/deployments.md#webhooks)
{% endcolumn %}
{% endcolumns %}
{% hint style="success" %}
Add matchmaking to your browser game with our optional [JavaScript SDK](/web-games/matchmaking.md), including a group client and server backfill automation.
{% endhint %}
### Samples
[Get inspired by five browser multiplayer minigames built with Three.js and authoritative Node.js servers.](/docs/sample-projects/web-games/threejs-minigames.md) Includes matchmaking from the browser, one image for multiple games, team assignment, and deployments that stop themselves when the match ends.
{% hint style="success" %}
[Browse our Game Samples](/docs/sample-projects.md) to get inspired and gain confidence to move forward with your project.
{% endhint %}
### Optimize Usage
A few tips to get started with optimizing your server usage:
**Higher tick rate means more updates, requiring more CPU usage and data egress.**
* Browser games often simulate at 30-60 ticks per second and send state to players at 10-20 Hz, with clients interpolating between updates. Our Three.js sample sends 20 updates per second.
* Node.js runs your game loop on a single thread, so a slow tick delays messages for every player. Tread carefully if your game has many players per match (10+), complex physical simulations, or many bot opponents/teammates. Profile your server with `node --cpu-prof` to find hot spots.
* JSON messages are easy to debug, binary messages (`ArrayBuffer`) reduce data egress for frequent state updates.
**How to choose the right networking protocol? Make it work first, then make it better.**
* Browsers can't open raw UDP or TCP connections, only WebSocket, WebRTC, and WebTransport. WebSockets are a great default choice providing compatibility across the biggest range of devices and networks.
* Some fast-paced games may want to experiment with WebRTC data channels or WebTransport for unreliable delivery, but it will certainly require extra development efforts. Ask yourself if this is critical for your target audience.
* Pick your battles carefully, game development has no shortage of challenges.
### Customize Image
Your Dockerfile from step [#id-3.-containerize-server](#id-3.-containerize-server "mention") can be customized for build size optimization, extraneous dependencies, or requiring more complex startup process. We’ll now share a few “do it yourself” tips and best practices.
**Bundle your server into a single file with a multi-stage build.**
* Bundlers like [esbuild](https://esbuild.github.io/) compile TypeScript and combine your code and dependencies into one file, so your final image doesn't need `node_modules` or source files. Savings grow with the size of your dependency tree.
* Install esbuild with `npm install --save-dev esbuild` and replace your Dockerfile with:
{% code title="Dockerfile" collapsedlinecount="10" %}
```docker
FROM node:22-slim AS build
WORKDIR /app
COPY package.json package-lock.json ./
RUN npm ci
COPY server.js ./
RUN npx esbuild server.js --bundle --platform=node --target=node22 --outfile=dist/server.cjs
FROM node:22-slim
WORKDIR /app
ENV NODE_ENV=production
COPY --from=build /app/dist/server.cjs ./
USER node
CMD ["node", "server.cjs"]
```
{% endcode %}
**Always make sure you are working with a functioning server build.**
* Before assuming an issue is related to the custom Dockerfile, ensure your server build can be started, and that the build process in your game engine didn’t throw any exceptions or errors.
**Always test locally before uploading.**
* Testing your image locally will save you lots of time while waiting for the upload to finish. It’s also entirely free ✨ as it doesn’t require any Edgegap resources.
* When testing locally, make sure to set your internal port correctly:
```bash
docker run \
-p 7777/udp \
-e ARBITRIUM_PORTS_MAPPING='{"ports":{"gameport":{"internal":7777}}}' \
'registry.edgegap.com/:'
```
**Make sure you’ve got the basics down. Every Dockerfile needs a few essential commands:**
* `FROM {image}` is your base image, we usually use a long-term supported Linux, but any Linux-based base image will do. These are usually public images stored on dockerhub. Dockerfile reference here. [Dockerfile reference here](https://docs.docker.com/reference/dockerfile/#from).
* `COPY {source} {destination}` to copy your linux server build from your host machine inside the image, so you can start it later on. [Dockerfile reference here](https://docs.docker.com/reference/dockerfile/#copy).
* `USER {user}` should follow after a [useradd (ubuntu) command](https://manpages.ubuntu.com/manpages/bionic/man8/useradd.8.html) or equivalent, it’s best not to run everything as `root` to be on the safer side. [Dockerfile reference here](https://docs.docker.com/reference/dockerfile/#user).
* `CMD {command}` will be the last line, most likely calling a `StartServer.sh` or some kind of startup script to make sure your server initializes correctly once everything is set up. [Dockerfile reference here](https://docs.docker.com/reference/dockerfile/#cmd).
* do NOT use `VOLUME` - you will not be able to mount any local storage this way on Edgegap, consider our Endpoint Storage feature instead and use an S3 bucket, see [Endpoint Storage](https://docs.edgegap.com/docs/deployment/endpoint-storage),
* `EXPOSE 7777/UDP` is not required! This will not actually make the internal server port available from outside the container, it's only a hint for the developer and the port needs to be
* published when testing locally with `docker run -p 7777/udp` ,
* or mapped in [Edgegap Port Mapping](/learn/orchestration/application-and-versions.md#other-parameters-optional).
**Delay declaration of parameters until latest possible moment. Configurability > composability due to long server build times.** [**Apply this approach to Dockerfile commands to build and upload faster.**](https://medium.com/@esotericmeans/optimizing-your-dockerfile-dc4b7b527756)
* Scenario: you need to define parameters like deployment stage, version, game mode, map, player count per server, backup frequency, or similar.
* Bad solution: creating a separate image for every combination of your parameters. You will spend all of your time rebuilding the images with very little benefits from this approach.
* Better solution - substitute configuration parameters just in time:
1. deployment parameters - supplied just before the deployment is made - matchmaking selectors passed as environment variables, or your custom session management system passing environment variables at deployment time,
2. version parameters - shared for all deployments on an app version - deployment stage, artifact tag, third party secrets and endpoints, and similar; then
3. one single image - contains and loads all configuration options when launched.
**Do NOT run databases on Edgegap deployments.**
* Edgegap deployments are not intended for long-running processes and may be terminated after a long period of runtime without prior notice. A database (even if distributed) running in this manner may be terminated and result in an irreversible loss of data. If you need a database, please consider a third party DBaaS.
* Consider using our [Managed Clusters](https://app.edgegap.com/cluster-management/clusters/list) for hosting databases and long running services.